File
This section describes how to connect to ordinary txt or csv files from Datero.
Notice
Used approach is almost identical to the one described in the SQLite section.
Environment
Environment setup for the File connector is different from the other connectors like MySQL or Postgres.
Main requirement is to have file accessible on the file system within datero container.
To make this happen, we need to mount it to some folder inside container and connect to it from there.
We couldn't use datero container created in the installation section, because we created it without any mounts defined.
Let's spin up a new datero_mount container but this time specify a mount folder where we will put our source file.
We mount current folder $(pwd) to the /data folder inside the container.
GitBash on Windows
If you are on Windows, you must specify absolute path to the current folder.
For example, c:/Users/user/some/path.
Or expand current directory with %cd% if you are running the command from cmd.
Do not run docker commands with folder mounts specified from GitBash.
Because GitBash is a Linux emulator for Windows, it will translate Windows paths to Linux paths.
And docker will not be able to find the folder.
# stopping currently running container, if any, to free up ports
docker stop datero
# starting new container with current folder mounted to /data folder inside the container
docker run -d --name datero_mount \
    -p 80:80 -p 5432:5432 \
    -e POSTGRES_PASSWORD=postgres \
    -v "$(pwd):/data" \
    chumaky/datero
File setup
Now we need to create some test csv file.
Let's create a transport.csv file with the following content.
Because we created file in a current directory which is mounted to the /data folder inside the container, we should be able to access it from the container.
Let's check that by executing cat command from the container.
Datero connection
Open Datero web ui at http://localhost and click on the File entry in the the Connectors navigation section on the left.
Enter any descriptive name in the Description field. For example, File Server.
File connector is zero params connector, so provided name is the only thing we need.
Click Save to create the Server logical object.
| Connector | Connection Form |
|---|---|
 |
 |
Import table
After the Server is created, we can create table which will be pointed to the source file.
Work in progress
Automatic fetch of the list of available files is under development.
Corresponding form is empty for now.
User needs to define foreign table manually in the Query Editor.
| Server Object | Import Table |
|---|---|
 |
 |
Future "Data Lake" plans
We plan to add automatic fetching of the list of available files.
To get your data files automatically scanned it would be enough just mount the folder with your files to the /data folder inside the container.
And you will get your data lake automatically imported into Datero with zero configuration!
Because automatic fetching of the files list is under development, we need to define foreign table manually.
 Navigate to the
 Query Editor by clicking on the corresponding icon in the navigation section on the left.
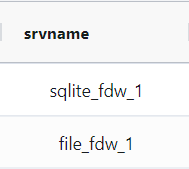
Get the names of already created server objects via the query.
file_fdw_1 is the internal name of the File Server object that we created in the previous step.
We should use it in the CREATE FOREIGN TABLE statement.
DROP SCHEMA IF EXISTS data_lake CASCADE;
CREATE SCHEMA IF NOT EXISTS data_lake;

CREATE FOREIGN TABLE data_lake.transport
( id        int
, name      varchar
) SERVER file_fdw_1
OPTIONS (filename '/data/transport.csv', format 'csv', header 'true');
Ctrl+Enter or clicking green Run button above.
We are ready now to query our transport.csv file from Datero.
Data Querying
Click on the Query Editor icon in the left navigation panel.
You will see data_lake schema in the Datero object tree.
If you expand it, you will see transport table from original transport.csv file.
To query data just write a query in the editor and press Ctrl+Enter or click green Run button above.

And that's it! You have successfully queried csv file data from Datero.
Summary
Of course, having just a single datasource is not very interesting. It's non-distinguishable from the direct connection to the file datasource via any other tool, like DBeaver. But the real power of Datero is in its ability to connect to multiple datasources and join data from them.
This is what is not possible via the "direct connection" tools. Even if they support connecting to multiple datasources, they don't support joining the data from them.